Wild Garlic Bärlauch Pesto

IMG_0216 copy

Tis the season to be stinking of wild garlic! Ramsons! Bärlauch! Now is the time to go forth and forage, bring home bunches of this pungent Springtime allium and whizz it mercilessly into glorious green pesto – for adorning your pasta, cheese sandwich, potatoes,  pizza, what have you.

Continue reading Wild Garlic Bärlauch Pesto

Advertisement

Pumpkin Spice Soda Bread

IMG_6517 copy

I’m thinking of re-naming my blog: The Ill-equipped Kitchen, as a spice grinder I do not have, among other things. However, I did have an empty supermarket salt grinder, which I was able to use to grind up the allspice.

IMG_6534 copy

I have never ordered a pumpkin spice whatnot from a coffee chain, but I was craving a seasonal fix of spicy carbohydrates and thought a pumpkin spice soda bread would hit the spot. Soda bread is one of the easiest breads to make, which is why I make it all the time! It’s easy to add extra ingredients depending on the seasons or your craving. Or just say feck it and keep it simple – you’ll still turn out a wonderful loaf.

Continue reading Pumpkin Spice Soda Bread

Make Your Own: Chocolate Truffles, Chocolate Tart

IMG_4859 copy

Dates and oats. Oats and dates. Dates and oats and figs and dark chocolate and coconut and and and.

These chocolate truffles are probably my favourite thing to make ever – I make them every week, keep them in the fridge to have with a coffee, or to give away as a gift.

IMG_2555 copy 2

Since it was a friend’s birthday this week, I thought of making a tart, instead of dividing up the base into truffles.

IMG_4861 copy

1 cup oats
1 cup dates, pitted and chopped
2 tbsp raw kakao or good quality kakao
1 fig
Edible flowers (calendula, nasturtium, borage)
dark chocolate
coconut milk

Soak dates in a few tablespoons of hot water overnight, or at least a half an hour before blending. You can skip that step if you use Medjool dates.

    • Mix up the oats, dates, and kakao well
    • Blend for a minute or two until you have a smooth paste. If mix is a bit dry, add a tablespoon of water at a time – you can’t reverse this step so add extra liquid only a tiny bit at a time.

If making truffles, spoon out a ball of the paste, roll it in your hands and roll the ball in your topping (I love desiccated coconut for this).

If making a flat tart, place a scone cutter in the desired size on a piece of greaseproof paper, and fill the paste inside. Smooth over the top with a spoon as much as you can. Pop it in the freezer for a few minutes.

    • Melt dark chocolate in a bainmarie
    • Once melted, add 2 tablespoons coconut milk (this means the chocolate covering will be more of of a softer ganache, instead of a hard chocolate covering which is difficult to cut)
    • Take date base out of the freezer (if making the tart)
    • Slather chocolate ganache all over the date base / truffles
    • Add fruit, edible flowers, figs, or nuts and seeds as a topping
    • Leave in the fridge to cool

Keep in an airtight container for a few days. They probably won’t last that long though 🙂

11026146_10153215757694747_4249269583485379338_n
These truffles have dark chocolate drizzled over them (no added coconut milk). You can see the chocolate covering is much more dribbly and thin. It’s alright for the truffles because they are bite size and you don’t need to cut them, but I advise making the softer ganache for a tart. Ok! Ok.


Oat Loaf for Lazy Oafs

It’s the weekend. Can’t be arsed with kneading dough for 10 minutes but still want a freshly baked vehicle for your butter / gooey egg / cheese?

Step right up: OAT LOAF. Made of the simple things in life: oats, and yogurt.

IMG_3691 copy

IMG_3692 copy

Also: technically oats are gluten free. Buy a package which states gluten free, and use gluten free baking soda to fully ensure the gluten free-ness.

500g oats
500 ml natural yogurt
2 tspns baking soda
1 tspn salt
2 tblspns olive oil
Optional:
Garlic
Rosemary
Sunflower seeds

Preheat oven to 180ish C

When you’re measuring out ingredients increase the effortless level and use the 500ml yogurt tub to measure out 2 tubs of oats. None of this weighing malarkey. I toasted the garlic in the olive oil first, and but you can skip if you want. Add whatever herbs or seeds you prefer.

Mix dry ingredients in a bowl
Mix wet ingredients in a bowl
Add wet to dry and mix, in a lazy weekend fashion
Turn out into your loaf pan (I used a ceramic dish and lined it with baking paper)
Bake in the oven for 45 minutes. For the last 10 minutes, remove the loaf from the tin/dish and turn it upside down.

IMG_3699 copy

Let it sit for about 10 minutes when it comes out of the oven: then you’ll be able to peel off the paper effortlessly, or take it out of it’s tin without sticking.

IMG_3703 copy

Slather on your favourite toppings: avocado, gooey egg, goats cheese

IMG_3719 copy

IMG_3716 copy

Oat loaf lazy oaf level: achieved.

The Best Pizza in Berlin

…comes out of your own oven!

pizza

Sironi Bakery in Markthalle Neun not only offers delicious pizza, focaccia, ciabbata, maritozzi, and giant loves of freshly baked bread – but did you know you that at the Sironi counter you can also pick up bags of Italian flour to take home and make your own? Last week I bought a kilo bag of their Italian 00 flour to make pizza. Bonus: at the time I didn’t even realise, but it’s organic as well.

IMG_2515

Pizza is pretty simple:

1 kilo flour (this will give you about 6-8 pizza bases)
1 tablespoon salt
2 sachets of yeast into 650 mls of room temp-ish slightly warm water
1 tablespoon honey (or you can use sugar. Some people say honey adds colour and crunch to the crust (I agree). Try it!)

Add the tablespoon of honey and 2 sachets of yeast to the water, mix and allow the yeast to get busy for a few minutes.
Empty your flour into a large bowl with tablespoon of salt mixed through. Start adding the yeast mixture to the flour, mixing with a fork as you go. (You can use a flat work surface if you have ninja flour handling skills, but I’m too messy so I use a bowl.)

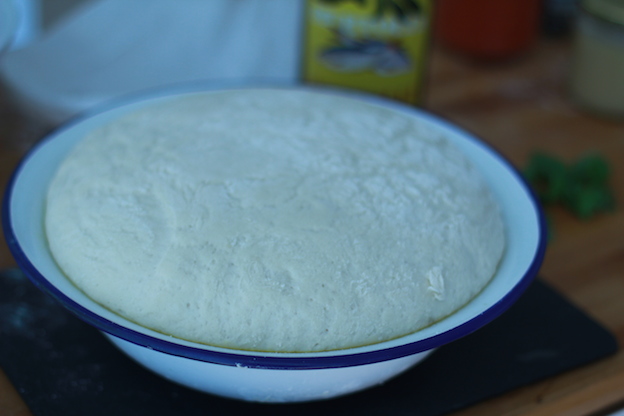
Flour a clean work surface and turn your dough out of the bowl. Knead the heck out of your dough for about 10 minutes. Daydream about eating pizza to help pass the time. Words that describe what you’re looking for: smooth, elastic, springy. This takes about 10 minutes to achieve, and your dough won’t rise if you don’t knead it for long enough, so hang in there! Stretch the dough away from you, stretch it between your hands, turn, repeat. After kneading, place the dough in a large oiled bowl, cover with a clean teatowel and leave somewhere cosy (no draughts please) until the dough has doubled in size – at least an hour.

IMG_2468

Omg gigantic dough pet! Turn your dough out onto a clean work surface and divide it into 6-8 pieces, shape each into a ball. How many pieces you cut your dough into, depends on what size pizzas you like. Freeze some for another day, or use them all fresh if you’re having a pizza parrrrrrty.

Flour each ball of pizza dough and cover with clingfilm, leave to sit for 20 minutes. Crank up the oven to VERY HOT (I set mine to 250 C, it never seems to quite there, but it tries). Put your tray in to heat up, which helps with cooking the base. Use pizza stone as per instructions.

Now flour your work surface and rolling pin and roll out your pizza bases to desired thickness. Transfer the base to the pizza stone or tray.

For tomato sauce:

1 tin tomatoes (organic if you can, there is a difference in zinginess, taste and brightness of colour)
3 cloves garlic
salt, pepper
olive oil

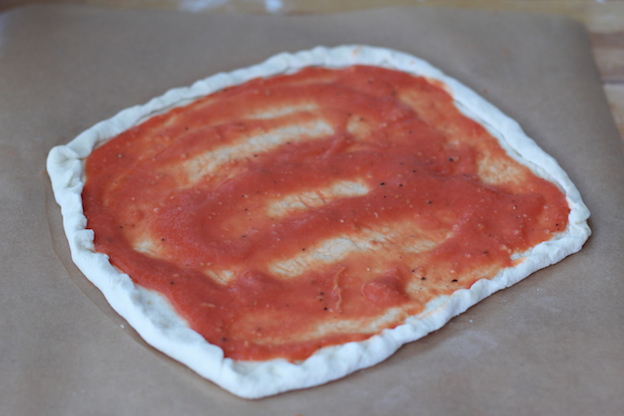
Using a blender, blend the tomatoes and garlic together and season with salt and pepper. Don’t cook the pizza sauce, it will cook on top of the pizza, and the taste will be much more vibrant (plus you save time and pots).

Slather the tomato sauce on to your pizza, add whatever toppings you like. Roll over the edges of the pizza base to create a little border to stop toppings oozing out the sides.

IMG_2487

Pop it into the oven and keep an eye on it, can take 12-15 minutes at 250 C (my oven).

Of course, nothing compares to the real thing. You’ll still find me queueing for my fix of a Sironi Margherita slice. I only hope you try to make your own pizza sometime, it’s fun, it tastes great, you save money, and time.

Breaking down the cost, I think the Sironi flour was around €3.50, the organic tinned tomatoes were about 80 cents, and mozzarella 55 cents. You could make four good size pizzas with those toppings, and have 4 bases stashed in your freezer for a rainy day. You can also use organic bread flour (type 405) to make the pizza base, which you can find in supermarkets here for about €1.

Watermelon Salad Bowl

IMG_2374 copy

We’ve all carried a watermelon at some stage. This time, carry that watermelon with pride, you’ll be putting together a delectable summer salad (and perhaps cocktails for two).

Watermelons are awesome because i) they are watermelons and ii) you can use them as the serving bowl!!!!! How cool is that. We like that.

This salad couldn’t be easier. Assemble your ingredients:

IMG_2367 copy

These anniversary bottles of Bertolli olive oil were on sale at the supermarket. Straight into my basket.

IMG_2374 copy

Watermelon (that you carried). Halve, scoop out the flesh, and chop it into bitesize pieces.
Feta
Mint
Red onion
Dressing: olive oil & fresh lemon juice
Optional: freshly crushed black pepper

Chop, crumble, drizzle and mix everything together. Transfer to the now hollowed-out watermelon and serve up.

IMG_2393 copy

IMG_2384 copy

You can basically eat this for breakfast, lunch or dinner. Great as a side dish if you’re serving meat, I had a large bowl for lunch. Next time I’ll try this with baked halloumi.

Of course, there’s that watermelon juice. When you’re scooping out the melon, drain off the juice every now and then, you’ll have enough to share a glass with your honey. Or have two glasses for yoself. (With a splash of vodka or prosecco, if you fancy).

IMG_2398 copy

Watermelons are still in season so carry one home today!

Make Your Own: Flatbreads

These flatbreads are a gorgeous fluffy and bubbly bready side dish, ideal for dipping in a curry or seasonal soup, or slathering with hummus as I chose to do.

The glory of this recipe is that it’s equal parts yogurt and flour. Yogurt? YOGURT! Really? Yassssssss! Easy to remember, easy to get your mise en place all mised up.

IMG_1963

Go big or go home, so:

500g plain flour*
500g yogurt
1 sachet baking powder (16g)
Pinch of salt

Add baking powder and salt to flour in a large bowl. Add yogurt gradually, mixing well as you go. Once all the ingredients are mixed together in the bowl, flour your hands, shape the dough slightly and turn out onto a floured surface. Knead for a minute, just to bring it all together (the kneading required for yeast bread not required here!). This dough makes about 15 flatbreads (I like them about hand-size). It’s handy if you cut the dough in half, then cut each half into about 7-8 pieces.

*As we are in Germany, self-raising flour is a rarely spotted species. So add a 16g packet of baking powder to the 500g plain flour as a replacement. If you live somewhere with easily accessible self-raising flour, use it, and enjoy that luxury my friend.

Turn your griddle on to medium-high (or if you don’t have one, a heavy bottomed pan as I used). Roll out each flatbread to about hand-size, and use a knife to cut a few lines into the dough. Give each flatbread a couple of minutes on the heat for each side in the pan/on the griddle. You don’t need to add any oils etc here. It won’t stick, I promise! You’ll notice the bread poofing up and developing bubbles and gorgeous bihha char.

IMG_1929

For next-lev flatbreads, toast some garlic in olive oil in a seperate pan for a few minutes. Take the oil off the heat once the garlic is golden. Chop up a bunch of parsley and mix it through the oil. Brush your flatbreads with this garlicky, herby unctious oil, and then rub your belly with glee.

IMG_1960

One day I wondered if a flour and yogurt flatbread could me made, and lo I found Jamie Oliver’s recipe. It calls for self-raising flour, and uses a slightly less amount of flour. I also opted for oil instead of butter for the additional add-on slathering.